Friday, May 22, 2015

Wall by Face via Generic Model Family

I learned something new yesterday from Brian Mackey in his monthly webinar "Revit Radio" with guys from CAD-1 so I thought I'd share it here. When dealing with non-vertical wall, you either have to model wall as in-place family or using massing and create Wall-by-Face. Either way is a valid method. What's new to me is that you can also use Wall-by-Face and pick a surface of a Generic Model family in a project and create a wall. This includes Adaptive Component created as generic model. This is such a good news to me. Why? Compare with Massing family, adaptive component has adaptive points where it can be very flexible to host on anything in the project. One will be able to create a surface with AC and use Wall-by-Face to generate this kind of free form wall.

Start with a simple 4 point adaptive component.


I am using this family to replicate the curve wall from Philip Johnson's St. Basil's chapel in Houston, Texas.


To do so, I will need one edge to be curve and set a shape handle point along the curve in order to adjust the location.


When finished, place the family like this in the project.


With the adaptive point (4) and shape handle point, I can adjust the edge very easy with no need to use formula or special parameter.


Next, use Wall-by-Face command under wall.

and pick face...


and DONE!


Wednesday, April 29, 2015

Revit Update Site - All in One Place

Have you ever had trouble finding Revit update from Autodesk site? Every time there is a new update Autodesk would create a new page hosting all the downloads. Today I saw they posted a new site where they put all updates in one place, finally! I hope this link stays because I will go there to find the update to download from now on!

They even have link for 2016 even there is no update posted yet.

For 2015

For 2014

For 2013

For 2012

Tuesday, April 28, 2015

Directing Your Beam System


This post has been long overdue and I just have been so busy lately. So here goes!

Beam system is one of my favorite tools in the recent days of using Revit. It is very easy to use, very flexible and you can apply it in many situations in one project.


For example, for any outdoor wood trellis, you can create them by using beam system and structural columns. Like anything else in Revit, beam system requires the user to place on work plane. By default, it will associate with your level (finish floor). With that in mind, you can use beam on slope and vertical surface, like exposed rafter underneath your roof and purlins on the vertical panel.

I came across and found out from many users who hardly heard of beam system or even know how to use them in the project. There is not a lot of online resource either to document how to best use beam system. I also have user who would create array group of a beam and use it in lieu of beam system.

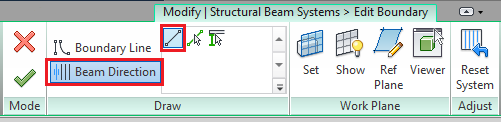
To start with beam system, one of the first requirements is to have at least one existing beam family (structural framing family) loaded to the project. Click on the beam system command, and you will get in the sketch mode (much like modeling a floor) and drawing your footprint of the beam system. Notice there is always one edge of your sketch that has a double short lines hovering that side, that is the beam direction that indicating where the beam is "array" from. You will need to understand how to manipulate this for later.


Also notice on the properties dialog box where there are a few settings you can adjust. All of them are instance parameters. You can change your layout rule to your liking, which will give you different options of the "spacing" requirement. I use Fixed distance almost exclusively on the project since I want the beam to have the exactly spacing from one another. You can use change the justification to determine where the placement of the first beam in the system.


This is where the tricky part comes in. I can bet you almost every time no matter which options you choose from (Start, end or center), your beam is not going to align with your other element (i.e. in this case, your column family) You will probably try to nudge it from your sketch and hope your beam will fall onto the right location to match up your column.

Don't do it! Revit actually has another option where you can get your beam to the exact location every single time. First, go to properties, under the justification option, there is one last option called Direction Line. Choose that option, you will notice nothing will change.


The key is you have to go back to edit mode of the beam system, get into the sketch. Select Beam Direction, and use the line tool to tell Revit where your want the first placement of your beam is (see image) and click Finish. Now your beam will always align with your other elements.


You can see the difference after using the direction line with your own sketch.


Happy Beaming!

Friday, March 13, 2015

Shortcut to Transfer Your Material

One can apply material (finishes) to almost any object in Revit. It basically comes down to assign material to the elements. Depending on the type of family in Revit, there are different way of accessing the material parameter in the family. Have you ever had a need to try to use the same material across different category of element? This process could get pretty tedious sometimes. For example, I have a wood floor finish that wants to be used as wood panel on the wall; To do so, you will have to assign the same material to both wall and floor type. In order to access the material setting for system families like wall, floor, ceiling and roof, you have to click so many times to get to the structure parameter of the layer of that particular finish. From there, you will further need to access the Material Browser and choose the desired material and click ok. Well, I think this is just too many clicks to me, especially the process is usually slower once you are inside the Material Browser.


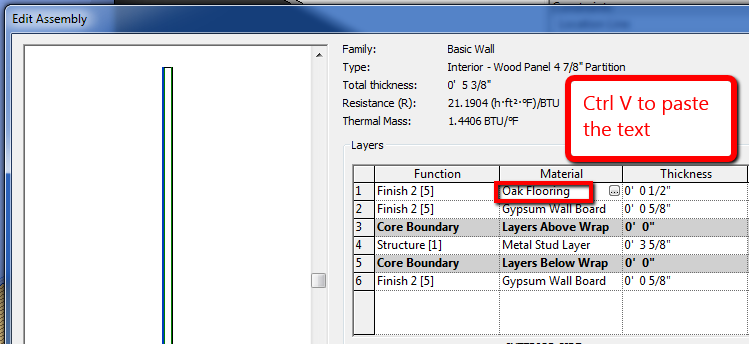
Here's a shortcut that is going to save you a lot of time. First go to select the material you want to use (from floor's properties), Highlight the text in the material field and use Ctrl + C (to copy), exit out the floor properties setting. Next, go to the material parameter that you want to place (wall properties in this case) and use Ctrl + V to paste the text in the field. 

You are done!


Ctrl + V to paste material to Wall Layer

This little trick will let you assign material without getting into the Material Browser at all. Using this method will save you lots of time during the process. You can apply the same concept on literally any kind of family with material parameter in Revit. 
Enjoy!