Showing posts with label Family. Show all posts

Wednesday, September 13, 2023

Un-Masking Your Furniture

Check out this new video on my YouTube Channel. (Yes! I started my YouTube channel a while back!)

I covered this everyday common issue when it comes to using 3rd party manufacturer furniture content on projects. The "masking region" issue with furniture families has been around for many years now. They can be commonly found in the free Revit content from the furniture manufacturer's website.

Go check out this video to learn how to clean up this annoying graphic issue!

Also, subscribe to my channel if you want to see more content in the future. 😉


Thursday, November 17, 2022

A Walk Down the Memory Lane - Curtain Wall

Christmas is near and it's that time of the year! 

Just thought about my annual Revit greeting card and how I modeled the Revit scene. The use of snow (and snowflake) has been in the background for years. 

Snow and snowflake in the scene


People who see this for the first time often asked how the snow and snowflake are modeled in Revit. This is done by using the Curtain wall tool (seriously!). No Dynamo or any scripting is needed to achieve that. 

This brings up a class I presented at 2012 Autodesk University. I can't believe it has been 10 years now. 

The topic was Unfold the Curtain! Think Outside the Curtain Wall Tool in Autodesk Revit

This was my first in-person live presentation at the Autodesk conference. I happened to search for something through the site today, and I am surprised to see the resource files from 10 years ago are still available online. That includes the recorded session!

If you are interested in seeing some creative use of the Curtain Wall tool, head over to the link below and check it out! Many of the techniques I covered are still applicable in Revit. 

No need to sign in to the site. 

Unfold the Curtain! Think Outside the Curtain Wall Tool in Autodesk Revit

If you have issues viewing the content, I have the pdfs saved here via Google doc.

Cheers!

Sunday, January 31, 2021

BIM Smith Winter Wonderland Holiday Revit Family Competition

There is no doubt 2020 has been a challenging year for all of us. Over the year-end holiday season, BIMSmith, a free Revit content online platform, hosted a Revit family creation holiday competition. It's a winter holiday-themed for Christmas, Hanukkah, Kwanzaa, or New Year. 


The rule is pretty simple. You create a Revit family that displays a seasonal or holiday theme. Then post the images of the family on one of the social media channels that are allowed and tag them. You can submit more than one entry. If the entry is chosen as a finalist, the actual family will be submitted for review. Of course, the work must be your original work. 

While many are still working from home or spend more time at home during this pandemic, as a long-term Revit user with a passion for content creation, I thought I'd give it a shot. 

My original plan was to submit an entry to beat the deadline on December 22, 2020. I later found out they had extended it to January 15, 2021. 

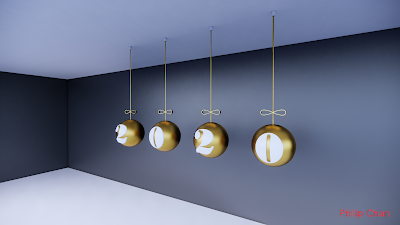
My first entry (Giant Ornaments)

That's the time (December 21) I started my winter break from my work. I normally would spend my Christmas break out of town with family, I now had all the extra time on my hands, so I started to think about creating more families for the competition. 

I started to build my second one, then a third one, and more ...

By the time I was done, I had a total of 5 entries! I can assure you that wasn't part of the plan, it literally just happened. 

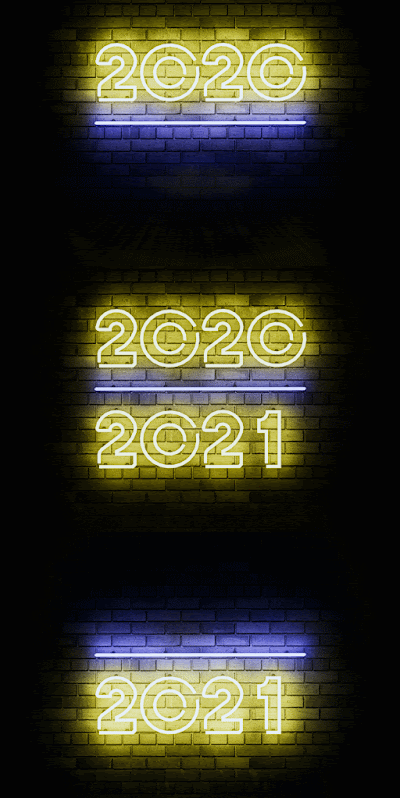
Out of the 5 entries, one was selected for the semi-final. It was a neon sign with the New Year 2020/2021 in it. The numbers (lights) lit up and down to represent the transition from the year 2020 to 2021. I actually enjoyed making that family a lot. I plan on writing a post to document the process for the family to share here on my blog.

BIMsmith recently made an announcement for the winners. My neon sign was selected as SECOND PLACE!!! That was pretty awesome. You can go check out the winners and other entries from this link

Neon sign created as Revit family rendered as GIF


You can find my other entries below in this post. 


This wired mesh Christmas tree is done as an adaptive component. The spacing of the grid, height, radius are all parametric. 

Wired mesh Christmas tree with lights

Rendered in Enscape


Round ornaments with number 2 0 2 0 and hung with cords. The last ornament "0" breaks open to show "1" for New Year 2021.


Rendered in Enscape and images run as GIF


Santa Claus and Elf sleighs. The sleigh is parametric. The width is adjustable to accommodate more passengers. I also made an option for Elfs. 

Sleigh modeled as family. Rendered in Enscape

Details


I am thankful for BIMsmith to host such an event to encourage Revit users to showcase their creativity in family creation. I am very much looking forward to this competition in 2021.

Monday, October 21, 2019

Something Borrowed

I can't believe it has been a long time I haven't written a single post. I definitely got lazy and didn't write anything even though I have number of things of Revit's tips and tricks to share.

So, here's a quick one that I am sharing today. I started to get back to build Revit family due to certain project need these days. I needed to build some nested family as kit of parts.

I stumbled on this when I notice this family has the caster wheel as model group. In the past I know you can copy/paste model group from project to project or from one family to another in family editors. However, I hardly use model groups when it comes to building family as I prefer to use nested family as kit of parts. Nested family (in my experience) is more stable and can be built in with parameters so I am always in favor of using that workflow.


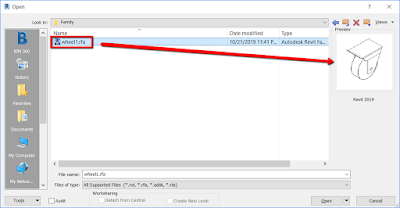
What I didn't know is I can simply go to the project browser, track down the model group, right click and save the model group to ... A NEW FAMILY!


Just like that! Now I can do some simple clean up in this new family and I can use it as kit of parts/nested family!
**If material is applied to the geometry, it will pass on to this new family.**


I really don't know when this became possible to do in Family Editor. Feel free to comment! 

I, however, will be sure to use this trick more often from now on. 😉


Sunday, January 21, 2018

Making of Holiday Card - Part 1 (Christmas Light)

Happy New Year 2018! I have waited long enough to start this post to share the making of my holiday greeting card in Revit. I will choose a few components from the scene and I am going to break it down to a few posts. The first one is about the Christmas string light. When I first posted this close-up image, I have a few people asked how I managed to place so many lights. Did I place them one by one? How do I get them on the roof?


Of course I didn't place them one at a time. In fact, I talked about this trick when I presented at RTC North America 2016 (now re-brand to BILT). My class title named Railing, Railing, Railing was about the railing improvement in Revit 2017. (i.e. One could host railing to the top of the wall, floor and roof, etc.)

In the class, I showed some possible use of railing (other than the actual function of railing) in a Revit project.  I talked about how to "hack" the railing support family


The idea is pretty simple. You start a new support family, insert the light fixture as nested family.
Make sure the nested light is set to "Shared".


From the nested light, I have different types family set as different colors. This is to allow me to change the colors of lights in the scene. I wrote this post in 2014 explaining how to use this conditional statement to drive different material which allows me to change to variety of colors. 


Next, I create a new railing type that has no railing profile, baluster; only a Handrail Type. This handrail type has a profile family (Profile Round String: Radius:1/8") that mimic the light's cable; A support family assigned with fixed distance 4" spacing. 


Once this is done, I can place it like any railing. It looks something like this:


Using Pick New Host, I can easily place the light (railing) on the roof. 


Select the light, use array to copy a dozen of times. 


Here's the problem. All the light bulbs are the same color. Since I made the nested light family "shared", I can select each light one at a time to change the color. But who has time for that?


It's time I turn to Dynamo for help. I pulled up an old script I used to randomize material in this post and modified it a bit. Good thing is the Family Types node includes railing support.


Ran the script and I am good to go.


This is what it looks like with night setting in Enscape.


Stay tuned for the next post! Thanks. 

Sunday, February 12, 2017

Vetting BIM content for your office

During the recent workshop at my Midwest offices visit, this same question was raised many times during the discussion. "Should we be downloading and using content from other websites for our project? If so, how do we know they are "okay" to use?"

Revit content has always been a popular topic throughout the years. Although many manufacturers have caught up with providing content for designers to use, they are not created equally. When the occasion arises where I need to "use" the content that I find from any website, I always go through this set of rules to vet the content. Below are the criteria I use to make my own assessment whether the downloaded content is good before I decide to make my own.

Disclaimer:
This is solely my own opinion and you should make adjustment to see it fits for your use. In addition, I use this logic when it comes to working on large scale projects/models. This can apply if you are the person managing the company's Revit content library.

**Edited on 2/26/2017** Family Category added.

Imported Geometry

Impact Level: 👎👎👎👎👎

This is probably my number one rule where no imported geometry whether it is from dwg, sat or skp format is allowed EVER. Period. You can't modify the geometry at all, can't apply material to the geometry (and set as instance parameter for material; although you can apply material through Object Style as a workaround). It comes with all kinds of baggage and will impact your model performance downstream.
I would avoid using family with imported geometry at all cost.


Sub-Category

Impact Level: 👎👎👎👎👎

Usually this is the result when there is an imported geometry introduced to the family, it brings all the "layers" from the CAD file and it turns these into sub-category under Imported Categories tab in Visibility Graphic setting. By loading the family to the project, all these sub-categories will carry over to your model; overtime, when you have other families with these rogue sub-categories, they will increase your filesize of the overall model.


Overdetail

Impact Level: 👎👎👎👎👎

I have seen this becomes more and more of an issue from families provided by manufacturer. The content from the manufacturer site will be modeled to match the "exact" size and shape per the specification, down to the nuts and bolts details. While having content with this kind of details could be useful if you need to take your scene/view for rendering or VR use, it will again weight down your model and navigating in 3D view will become significantly slow.


This family has geometry down to every single metal rod

(Unnecessary) Nested Families

Impact Level: 👎👎👎👎👎

I came across with these kind of families from many sites even some from the manufacturer. Essentially, the content creator of the family has no idea what they are doing at all. It has many nested families embedded in the host family but do not serve any purpose at all. The example below has over 17 nested families that are not being used at all; A "Door" family is nested into this chair which should not be there in the first place. The family size is over 5M, which is 5 to 8 times larger than the desired file size.


Raster Image

Impact Level: 👎👎👎

Raster images are another offender to contribute to large family file size. When I build my own content, occasionally I need to refer some images from a product or design for references, I could import the image to floor plan (or elevation view) and size the image accordingly. If you have images imported for any 3D family, the raster image will not display once you loaded in the project, it will only be stuck in the family. Hence, they can increase the file size too.


(Unused) Material

Impact Level: 👎👎👎

A few years ago I downloaded a chaise lounge family from a user community site. It was a nicely done family. When I examined it, there were over thousand materials in this family. Back in previous versions in Revit, you couldn't delete material using "purge unused", you could only delete the material one at a time in the material browser. *Now you can simply use Purge Unused.* Excessive material not only added to the family file size, they will migrate to the project file as well.


Filled Pattern & Line Patterns

Impact Level: 👎👎👎

From the same chaise lounge family, I was able to find hundreds and hundreds of Filled Patterns as well as Line Patterns, they will also contribute to the family file size overall.


(Too many/too less) Parameters

Impact Level: 👎👎

A good family should have parameters that are relevant to the family; For instance, family with material parameters that represent the geometry will allow the user to modify material in the project. Other parameters like width, length, depth of the family can be scheduled in the project.

On the other hand, having too many parameters can be confusing too. If it is a parametric family, having too many parameters require the user to understand how to leverage or modify the value when needed. Manufacturer families come with many (shared) parameters that populate the product information; many others are supposed to use for FM. Unfortunately, different manufacturer has different naming, organization for these FM parameters and it is nearly impossible to use them cohesively in a project. I normally would delete the parameters that are irrelevant to the users.

Family with no parameter or value defined 

User needs to have a good understanding in order to use the family properly. 


Level of Details

Impact Level: 👎👎

Many manufacturer offered families like to create the family with "Coarse", "Medium" and "Fine" level of detail. While this might be a good idea, it always causes confusion to the users. Often times, the coarse level of the family is nothing but a box; this could be easily misread as something else in a project when your model has tons of elements in the space. I generally go to family editor and get rid of the geometry that associates with coarse level visibility setting.


Family Category

Impact Level: 👎👎

Another common issue from downloaded families are set to be the incorrect Revit category. One way to easily identify the category is to open the family in family editor, click the Family Category and Parameters icon. The example below shows this chair is set to Generic Model category. This will become an issue once it is loaded to the project, such as scheduling as well as Visibility/Graphic Overrides setting.


Insertion Point

Impact Level: 👎👎

Never let the 3D view fool you. I know first thing many people do after downloading the family is to use it in the project. Before you do so, always open the family in family editor and check the other views (ref. level, front, right, left...). I have this dumbbell rack family many years ago. While it looks decent in 3D view, it is not properly done. The insertion point (default insertion point is the interception of the vertical and horizontal ref. plane) is not centered in the family. When I check the front elevation, the entire rack is rested below the ref. level (finish floor) in the family. What it means is when I place this family to the project, it sits below finished level.


Reference Planes

Impact Level: 👎

This has nothing to do with file size but just good practice. Only set the reference plane that matters to the followings: Front, back, left, right, center (front/back), center (left/right), weak reference & strong reference. By assigning a ref. plane to any of this property will allow Revit to snap/dimension to adjacent element when selecting the family in project.  Turn all the others to "Not a Reference"; this way, Revit will ignore it. On the other hand, if the family has many ref. planes and all of them are set to "weak reference" or something like that, Revit will try to snap or dimension in the project. This could result in inaccuracy in the model. Steve Stafford has a good blogpost years ago to explain much more in depth about the purpose of ref. plane.


To conclude, I hope this provides some good guidelines when you choose to download families from any site. You should always do your due diligence to validate the family prior using it in your project.