I was trying to send out a paperless card to people and be able to reach to many families, friends and colleagues at the same time. Instead of using some stock or generic images for my card, I was like "why don't I build something on my own?" Using Revit to make this had become a clear choice for me. At that time, my Revit experience was less than 2 years, I thought this would be a good opportunity for me to learn, to explore.
How to push the software to do something that is "not a building, nor Architecture"?
As you can see, my first one was merely a group of (parametric) snowman; and the snow in the scene. I was able to set up parameters to where almost everything in the snowman family can change. From the size and radius of the body, the hat height and location, to the length of the nose and the size of the eyes.
It was all about having fun. I was trying to create something to see how much I could do with the software at the time. Since I was trying to keep everything to be done in Revit, I also thought of ways to incorporate the texts into the scene in Revit. That would eliminate the need of using Photoshop for post production.
The snow was actually an after-thought when I completed the snowman. It felt blank. I asked myself how to build snow in Revit!? I later turned to my favorite curtain wall tool. I made a custom curtain panel in the curtain wall and had an instance parameter to control the size. I laid out a few walls in the scene and kind of manually changed the size of the snow where it looked good. It was quite tedious but I managed to get it to look decent.
Then I modeled the words as model text. That was it. Now that I look back, this whole thing looks very primitive.
When 2011 came, I decided to make another one again. I had an idea. Each year I wanted to have the snowman to be part of the card. In addition, I wanted to try something else I haven't done in the past.
For the 2011 card, it was to use reporting parameters to control the size and location of the snow. I also modeled the snow flake, too!
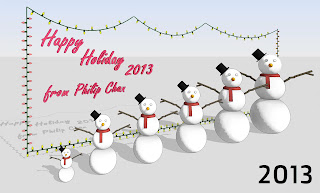
2012 was skipped. Came 2013, adaptive components was a hit subject at the time. So I made the Christmas light using AC. Plus, I used Kelvin Tam's planting trick to scale my snowman in the scene.
Adaptive component was my continuous effort and I was trying to explore more of the use with AC in 2014. The "parametric" Christmas tree and the star were the end result.
I really had fun in 2015 by hacking the support family from the railing to create curvy texts with the ribbon.
In 2016, it was once again using adaptive component to create a helix ribbon as "Christmas tree".
I was introduced to Enscape by Phil Read for a while. Enscape was definitely a game changer for me as it is a real time rendering plugin for Revit. I fell in love with it simply because it was so easy and intuitive to use. I also spent way more time than I anticipated to generate the scene. See more from this link. I learned a few new tricks for both Revit and Enscape; but more importantly, I enjoyed a lot throughout this project in 2017.
I got too busy in 2018 and I didn't have time to make one.
Here we are in 2019. Enscape once again doesn't disappoint me at all. The "new" things I incorporate this time are the giant ornament and the train track using Revit railing. For the first time, the train is a "downloaded" content from BIM store (www.bimstore.co) in UK. Kudos to them to offer well built content.
This is a long post for sure. I hope you have the patience to complete the reading. I guess the takeaway is to always challenge yourself, no matter what the circumstance is. That's because you will always learn something and be able to apply that knowledge for future. Every little things I learned from this Christmas project did help me pave the path for the things I do later.
Cheers!


Great job, philip ! I wonder what does 2020 card look like?
ReplyDelete